Category Archives: Golf Tips

SELECTING THE RIGHT SHAFT FOR YOUR GAME – SHAFT KICK POINT

Hello Golf Circuit Fans!

I’m back with the final installment in our series of selecting the right shaft for your game.  In our last three posts we’ve focused on shaft flex, shaft weight, and shaft torque.  Today, we’re zeroing in on one final element of proper shaft selection – kick point.

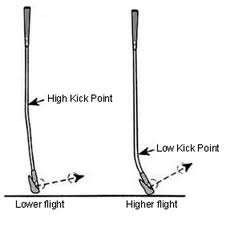
The kick point of a golf shaft refers to the place where it bends or flexes at impact, or how the flexibility of the shaft was distributed along the length of the shaft.  Today this may also be referred to as the bend profile or bend point of a shaft, but it really means the same thing.

There are a few things that golfers should keep in mind when evaluating the kick point of a shaft:

  • As a general rule shafts with low kick points will encourage a higher ball flight, so golfers looking for a higher trajectory should seek shafts with low kick points, and golfers seeking a lower trajectory should seek shafts with lower kick points.
  • Golfers with quick tempos and high swing speeds will generally prefer shafts that have a stiffer butt end, and golfers with smoother tempos and lower swing speeds are likely to prefer shafts with softer butt ends.
  • The later you release your club the stiffer you will want the tip end of the shaft to be to encourage optimum launch conditions.  If you tend to release the club early you will want to look for a shaft with a softer tip section.

It’s also important to keep in mind that kick points or bend profiles are not uniform between shaft manufacturers, and they also may differ between shaft flexes and weights.  This means that one shaft’s high kick point may not correlate directly to another’s.  Ultimately, it’s important to experiment with different shafts to see which fits your swing best.

Well – that wraps up our series on selecting the right shaft for your game!  Hopefully these four posts have been informative and give you some guidance when it comes to selecting the right shaft or shafts for your game, and with the new interchangeable technology in many of today’s newest driver’s experimenting with different shafts can be a lot of fun as long as you understand the elements that affect performance!

Until next time,

James

Golf Circuit PGA Teaching Professional

Click Here ====> Check Out Golf Circuit’s Great Selection of Shafts!

Tagged , , ,

SELECTING THE RIGHT SHAFT FOR YOUR GAME – SHAFT TORQUE

Hello Golf Fanatics!

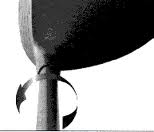
I’m back with another installment of Golf Circuit’s series on shaft fitting.  As more and more interchangeable drivers appear on the market it’s important that golfers understand all of the factors that go into selecting the right graphite shaft for their game. In our first two shaft fitting posts we focused on shaft flex and shaft weight, and today we’re going to zero in on another popular element of shaft fitting – torque. Shaft “torque” refers to the twisting of the shaft on the downswing and through impact.

Torque is measured in degrees, and ranges between 2 degrees to 8 degrees depending upon the construction and design of the shaft. The higher the torque the more twisting the shaft will experience during the swing. While torque is often discussed by both amateurs and professionals, it actually has a very limited effect on shaft performance. In my experience working with major equipment manufacturers shaft torque actually has more of an effect on the “feel” of a graphite shaft than the actual performance of the shaft.

Here are a few things to keep in mind when evaluating the torque of a shaft:

  • A graphite shaft with a torque range of 3 degrees to 6 degrees will be well suited to most any golfer.
  • A graphite shaft with a torque range of below 3 degrees may have a feel that is preferred by stronger players or those with quicker swing tempos.
  • A graphite shaft with a torque range of 7 degrees or higher may have a feel that is preferred by players with smoother, slower swing tempos.

Of the three elements of shaft fitting we have discussed so far torque is by far the least important. Both shaft flex and shaft weight will have a much more dramatic effect on the overall feel and performance of your club.

That’s all for this week my friends, but stay tuned next week when we wrap up our four part series on shaft fitting with a discussion on kick point and trajectory!

From Tee to Green,

James

Golf Circuit PGA Teaching Professional

Click Here ====> Check Out Golf Circuit’s Great Selection of Shafts!
Tagged , ,

SELECTING THE RIGHT SHAFT FOR YOUR GAME – SHAFT WEIGHT

Greetings Golf Circuit Fans!

Today I want to bring you the second installment of Golf Circuit‘s shaft fitting series.  In our first installment we focused on defining shaft flex and how it plays into performance and fitting, and today we’re going to focus on another element of graphite shaft construction and design – weight.

Measured in grams, Shaft weight is one of the most under appreciated elements of shaft fitting and it has a major role in the feel and performance of a golf club.  Today’s ultralight graphite shafts weigh in at around 40 or 50 grams, while their heavier counterparts tip the scales at 80 to 90 grams.

Shaft weight affects a club in the following ways:

  • Performance:  A heavier shaft will often be stiffer and better suited for stronger players, while ultra light shafts are engineered to increase swing speeds and increase distance in players with average to mild swing speeds.
  • Feel:  Heavier shafts can cause players with quick tempos to slow down their swings because they can actually feel the club more during their swing, while lighter shafts can almost feel weightless and easy to swing.  Heavier shafts are also sometimes well suited for experienced players who learned the game with older equipment since they better mimic the feel of the clubs they developed their swing for.

Use the following as general rules when selecting shaft weight for your swing:

  • 40-50 grams (ultra-light):  These shafts are best for players who like the feel of a lightweight club, swing with a smooth tempo, and have mid to low swing speeds.
  • 60-70 grams (mid-weight):  These shafts are great for average players who aren’t sure what they are looking for.  They fit a variety of swing speeds and tempos without a drastic light or heavy feel.
  • 80-90+ grams (heavy-weight):  These shafts are best fit for strong players with quick tempos who are looking for a substantial shaft that will help them control their swings.  These shafts can also be great for senior players who grew up building their swings using the heavier equipment of the past.

Keeping this information in mind should better help you understand the numbers found on your current graphite shafts, and also select new shafts that will improve your performance and lower your scores!

That’s all for this edition, but stay tuned for our next post when we will focus on another element of shaft fitting – torque.

Your Friend,

James

Golf Circuit PGA Teaching Professional

Click Here ====> Check Out Golf Circuit’s Great Selection of Shafts!
Tagged , ,

Selecting The Proper Shaft For Your Game – Shaft Flex

Hello Golf Circuit Fans!

I’m back with another blog post to help you get the most out of your game, and today I am kicking off a series of posts on a popular topic in the equipment world today – shaft fitting.  The new interchangeable shaft technology that manufacturers like TaylorMade, Callaway, Nike, and now Ping have introduced makes it a snap to alter the performance of your driver.

When it comes to selecting the proper shaft there are a few elements that every golfer should be aware of to ensure maximum performance for their unique swing – flex, weight, and torque.  In the first edition of my series on shaft fitting I want to focus on shaft flex.

Shaft flex has a significant bearing on performance.  Most graphite shaft manufacturers engineer their shafts in multiple flexes which refer to how easily the shaft bends during the swing, including the following:

  • “A-Flex” or “Soft-R” are often designated as mens senior flexes (“A” originally referred to amateur).  These can also be great for strong juniors or ladies with higher swing speeds, and also for men with extremely smooth swings.
  • “R-Flex” is designated as a mens regular flex, but can also be great for ladies with strong or quick swings.
  • “S-Flex” is designated as a mens stiff flex.
  • “X-Flex” or “Tour-S” are mens extra stiff flex.  These shafts are most often reserved for expert players, but they can be great for stronger men who have extremely quick swings.
  • “L-Flex” is designated as a ladies regular flex but can also be great for seniors with slower swing speeds.

Golfers should be aware that selecting a shaft which is too flexible for their swing will likely cause a wild shot pattern and unpredictable ball flight.  While a small boost in distance may result from a shaft that is too soft or flexible, the benefit is usually outweighed by the loss of directional control.  On the other hand, when golfers select a shaft that is too stiff they will likely experience enhanced control but a significant loss in distance.

Golfers can also utilize these different flex properties to match various courses and playing conditions.  A stiffer shaft may be better suited for a tight short course or windy conditions, while a softer shaft might be better suited to a wide open course in calm conditions.

Keeping these ideas in mind should help you find the right shaft(s) for your game and get the most out of today’s modern driver technology.  Stay tuned because next time we will be focusing in on another element of proper shaft fitting – shaft weight.

Until then keep it in the short stuff!

Your Friend,

James

Golf Circuit PGA Professional

Click Here ====> Check out Golf Circuit’s Great Selection of Interchangeable Shafts


Tagged , , ,

Outsmart The Course With These Mental Tips

Hello again Golf Circuit Fans!

Golf Circuit’s PGA Teaching Professional is back with another blog post to help you play your best, and today I want to focus on the mental side of the game.  I find that many of my students spend too much time trying to perfect their swing when they could drop their scores significantly by just playing smarter.  Here’s a few tips to help you make the most out of the swing you’ve already got…

  1. Set up for success on the tee box:  This one is a no-brainer!  When you are teeing up your ball it is important to make sure you are on side of the tee blocks that is going to give you the best chance of hitting a good shot and staying out of trouble.  To do this simply tee your ball up on the same side as the trouble.  This might seem counter-intuitive, but when you try it you will know why it’s one of my favorite little strategy tips.  When you tee up on the same side as the trouble you automatically open up the other side of the hole and reduce the chance that you will end up in the lumber yard.
  2. Don’t let a straight shot cost you:  This is another simple tip that I picked up a while back, and it’s helped me avoid lots of unnecessary frustration.  When you’re lining up your shot make sure that you don’t aim in a place where hitting a straight shot will cost you.  This may seem simple, but I always see other golfers playing for their slice and then ending up hitting one straight – right into the pond.  There’s nothing more frustrating then finally getting your swing figured out and still having to pay the price.  If you’re not confident enough in the club that you’re hitting to aim properly, maybe you should head back to the bag.
  3. Focus on the target not the swing:  When I’m out on the course I really try to avoid thinking about swing thoughts.  Instead, I focus on my target as much as I can and try to imagine myself hitting the shot I want before I actually do.  Think about it this way – if you’re going to crumple up a piece of paper and try to throw it in the wastebasket across the room are you going to worry about how you are bending your elbow and when you are going to release the paper from your hand?  I don’t think so!  You’re going to look at the wastebasket and use your intuition to give it your best toss.  That’s the kind of thoughts that I like to have when I’m out on the course – not complicated ones about swing technique.

That’s all for this edition – I hope these tips and tricks hep you all play smarter and have more fun!

From Tee to Green,

James

Lower Your Scores With Properly Fit Wedges

Hello Golf Circuit Followers!

My name is James and I am the resident PGA Teaching Pro here at Golf Circuit.  I’ll be posting tips here on our blog to help you get the most out of your game, and today I want to talk a little bit about your wedges.  There are two basic elements that affect the performance of your wedges, and ensuring that you have both fit to match your game can really help you lower your scores!

Loft:  Most pitching wedges have between 46 and 48 degrees of loft, and the gap in loft between irons is usually 4 or 5 degrees.  This gap, plus the change in length, is what causes irons to carry different distances.  Knowing the loft on your pitching wedge can help you select the proper wedges for your game.  If your pitching wedge has 46 degrees of loft, the next step down would be a 50 degree gap wedge, and then a 54 or 56 degree sand wedge, and then a 58 or 60 degree lob wedge.  Having the right lofts on your wedges makes it easy to hit variety of different shots without having to adjust your swing too much.

Bounce:  There is another angle called bounce that directly affects the performance of your wedges.  Bounce is the angle between the leading edge of your wedge and the turf and it’s usually between 8 and 14 degrees.  The higher the bounce the greater the distance between the leading edge and the turf or the sand.  High bounce wedges are great for players that take large divots, those playing in wet conditions, or those playing from fluffy sand.  Low bounce wedges are great for those who take little or no divot, those playing in hard pan conditions, or those playing from hard sand.

The easiest way to start building a set of wedges that fits your game is to have your pro measure your pitching wedge loft.  That will help you determine exactly what wedges you should be shopping for to minimize distance gaps.  Also, keep in mind the playing conditions at your local course(s) when selecting bounce to maximize your performance around the green.


From Tee to Green,

James


 P.S. Don’t forget to check out Golf Circuit’s great selection of wedges!  Click Here! <=======


Tagged

4 Tips for Playing from the Rough

BY GEOFF GREIG

If you are losing strokes when you have to deal with tall or thick rough, here are a few tips you may find helpful.

1. Use a lofted wood or lofted iron
Long irons are the most difficult clubs to use successfully in the rough. If you can see at least one third of the ball above the grass use a utility wood. The smaller round head of a 5,7,or 9 wood will not get snagged as easily when it passes through the grass. If the ball is completely submerged in the grass use a 6 iron or less. The extra loft will help you get the ball airborne and back to the fairway.

2. Take a divot after the ball
Whatever club you choose to swing make sure the clubhead is striking the ball with a descending blow. Do not try to lift or scoop the ball with your swing. The key to successful rough shots is to get as little grass between the clubface and the ball as possible. A descending blow insures the cleanest ball clubface contact possible. Let the loft of the club and the backspin created from the descending arc take care of getting the ball airborne.

3. No big slice, No big hook
The thicker or deeper the rough the straighter the ball will tend to fly. Grass between the ball and the clubface negates spin which means the ball will fly straighter and lower than normal. If you catch too much grass before striking the ball the hosel will get stuck , the face will close and you will pull the shot. Try your best to catch it clean and if there is a strong chance you may not, allow for it to go a little left.

4. Ball position is crucial
Too far forward means too much grass, too far back means too little loft. For the longer clubs the ball position should be slightly left of center. For the shorter clubs position the ball directly in the middle. If your swing is unorthodox experiment until you find the spot where you can consistently strike the ball before you catch enough grass to have the shot pull to the left. You may want to use an alignment tool to help you gauge your swing.

6 Quick Tips for Smart Chipping

BY GEOFF GREIG

1. Hit down to get it up and down.
Trying to scoop or lift the golf ball leads to inconsistent ball striking and poor distance control. Strive for a descending blow on all chip shots. Place the ball in middle or back of your stance to insure the club head strikes the ball before it strikes the ground.

2. Keep your weight left to hit it (correctly) right.
Setting up with your weight on your left foot and keeping it there throughout the shot makes it much easier to hit down on the ball consistently. Try hitting a few chips standing on your left foot only to feel a proper descending blow.

3. For simplicity chip like you putt.
A proper chip is merely a putt that travels in the air for part of the distance. The basics of putting and chipping are the same: pendulum motion, straight back straight through and no wrists. Let the lofted club and weight on the left foot take care of getting the ball airborne you should focus on a simple putting like motion.

4. Vary the backswing length to vary the distance.
Strive for consistent acceleration on the downswing and let the length of the backswing control the distance of the shot. Because the backswing happens at a slower pace it easier to make changes there as opposed to the downswing.

5. Pause for perfection.
Because the chipping motion is an abbreviated one we have a tendency to rush the pace of the swing. A brief pause between the backswing and the downswing will help keep the tempo smooth and insure acceleration through the ball.

6. Pick a precise landing spot.
Distance control is the key to good chipping. Learn the ratio of flight to roll of your favorite chipping clubs so you can pick an accurate landing spot for each chip. Precise focus leads to better results.

Every time you get a bucket of balls use a few of them for chipping practice, your scores will thank you.

Tagged , , , , , ,

How to choose a golf tee:

Choosing a golf tee should be more than rummaging aroung in the bottom of your golf bag.

1. Choose the length of golf tee you want.

Most golf tees come in one of four lengths: 2 1/8″, 2 3/4″, 3 1/4″, and 4″.  You can choose the 2 1/8″ or 2 3/4″ tees for hitting your hybrid  golf clubs or your irons off the tee. You can choose a 3 1/4″ tee for hitting smaller drivers off the tee, and 4 inch tees fo
when you’re using bigger drivers.

Most people only get one kind of tee for golfing, and so you’ll probably want to choose one of the middle two sizes, as they’re likely to be long enough, and you can always stick them deeper in the ground if you’re using a hybrid or an iron. That’s not always going to be the case if you get a 4″ tee. Those may be hard to get into the ground that far. So if you get 4″ golf tees, you’ll want to have some smaller tees along for when you tee of with a hybrid or your irons.

2. Plastic or Wood Tees?

Well there are good and bad for both kind of tees. If you choose plastic they are likely to last longer than wood tees. Some people feel that the plastic doesn’t have enough give when you strike the ball. Wood tees can break easily and you’ll have to have a lot more of them with you on the  golf course.

3. What style of tee should I use?

There are many different styles of tees around that promise all sorts of results. We suggest that you try different tees to see which one works best for you and then use it for a while and see if it makes a difference.

Brush Tee reduces friction during your drive off the tee. Brush Tee – The brush tee is a golf tee that utilizes flexible synthetic bristles that bend on impact to tee up the ball. It’s said to feel like you’re teeing off the air. The unique design reduces friction allowing for longer, straighter drives. These golf tees are 3 1/8″ in height.

Zero Friction Golf Tees

The Zero Friction and the Epoch golf tees are plastic tees that look more like traditional golf tees. The tops of these golf tees are designed to help reduce the friction and again increase the speed, distance and accuracy of your shot. Evolve Epoch Golf Tees The Zero Friction tees are 2 3/4″ and the Epoch golf tees are available in 2 3/4″ or 3 1/4″ lengths.

Traditional Wood Tees – If you prefer to use traditional wood tees you’ll have a lot of options to choose from. I like the Nike golf tees. They’re  2 3/5″ pro length, and give you all the flexibility you need. Or if you don’t want to pay for the brand name tee, you can choose these wood tees which are available in 2 3/4″ and 3 1/4″ inches long.Wood golf tees

What gets you teed up?

Tagged , , , ,

5 Step Pre Golf Shot Routine

Pre-Shot Routine

BY GEOFF GREIG

1. LINE UP YOUR TARGET
Pick a precise target for every shot. Stand behind the ball and find an intermediate target three to six inches in front of the ball on the target line. Once you have determined your intermediate target, visualize the golf ball flying or rolling to your target. Strong visualization skills lead to strong golf shots.

2. SQUARE THE CLUBFACE
The clubface is the only thing that touches the golf ball so it should be squared before anything else. Without taking your grip on the club, lay the clubface down so the leading edge is 90 degrees to your target line and it is soled flat on the ground. Use the intermediate target to determine the target line. It is much easier to be consistently accurate using a close by target as opposed to a far away target.

3. GRIP THE CLUB
Making sure the clubface does not move, take your grip. Set your left hand first then your right. Your swing will be much more efficient if both hands are parallel to each other and to the leading edge of the clubface. Double check to make sure the clubface is still square.

4. TAKE YOUR STANCE
Align your shoulders, hips and feet parallel to your target line. Center your weight between the balls of your feet and your heels. Your arms should be hanging vertically from your shoulders and they should be completely free of tension.

5. RESIGHT, RELAX, FIRE
Visualize the target spot and ball flight, relax your muscles and swing. The longer you take to complete this step the worse your chances become to produce a good shot. Do not allow excess thoughts to creep into your mind. Once you get to this step, focus on the target and pull the trigger. The longer you stand over the golf ball without swinging the tenser your body becomes.

Personalize this routine and use it on every shot. It should only take 10 to 15 seconds and it will make a tremendous difference in your game.

Tagged , , , ,